Salta al contenuto principale

ASUS K751MA- DS21TQ Screen Replacement

Cosa ti serve

  1. ASUS K751MA- DS21TQ  Screen Replacement, .: passo 1, immagine 1 di 1
    • Use a 7 day pill container to keep screws sorted. They are different lengths. . . . . . . . All screws removed are Phillips #00.

    • Remove four ~6mm long screws along the front side of the bottom.

    • Remove the 6 remaining screws ~14mm long from the bottom of the computer. Yellow circles.

    • Turn the computer over, open the lid, and pry the keyboard / palm rest from the bottom of the case with a plastic spudge.

  2. ASUS K751MA- DS21TQ  Screen Replacement: passo 2, immagine 1 di 1
    • Lift the front of the separated keyboard / palm rest about 10 inches up and release the mouse pad cable from the motherboard. (ZIF)

    • Hold the keyboard at 90 deg and disconnect the battery.

    • Untape the keyboard connector.

    • Release the keyboard cable from the motherboard. (ZIF)

    • The keyboard / palm is now free. Set it aside.

  3. ASUS K751MA- DS21TQ  Screen Replacement: passo 3, immagine 1 di 1
    • Remove two ~5mm screws holding the power button module.

  4. ASUS K751MA- DS21TQ  Screen Replacement: passo 4, immagine 1 di 1
    • Untape and remove WiFi cables (coaxial connectors) from the WiFi module.

  5. ASUS K751MA- DS21TQ  Screen Replacement: passo 5, immagine 1 di 1
    • Slide out the small white camera cable connector just to the left of the video connector.

    • Untape, slide out the video cable, and de-route it.

  6. ASUS K751MA- DS21TQ  Screen Replacement: passo 6, immagine 1 di 1
    • With the display vertical, remove the two left hinge ~5mm screws.

  7. ASUS K751MA- DS21TQ  Screen Replacement: passo 7, immagine 1 di 1
    • Support the display and remove the four right hinge ~5mm screws.

  8. ASUS K751MA- DS21TQ  Screen Replacement: passo 8, immagine 1 di 2 ASUS K751MA- DS21TQ  Screen Replacement: passo 8, immagine 2 di 2
    • Lift the display assembly straight up and away. Set it aside

    • Remove the left and right screw covers and ~4mm screws at the bottom of the display assembly located near the corners.

  9. ASUS K751MA- DS21TQ  Screen Replacement: passo 9, immagine 1 di 2 ASUS K751MA- DS21TQ  Screen Replacement: passo 9, immagine 2 di 2
    • Note routing of WiFi cables, and video cable.

  10. ASUS K751MA- DS21TQ  Screen Replacement: passo 10, immagine 1 di 1
    • Spudge in at the bottom corner of the display assembly.

    • Leave spudge inserted just enough to keep the bezel separated and pry hinge cover apart by pressing down on the seam.

    • The upper half of the hinge remains attached to the bezel. This part is fragile and can be easily snapped off.

  11. ASUS K751MA- DS21TQ  Screen Replacement: passo 11, immagine 1 di 3 ASUS K751MA- DS21TQ  Screen Replacement: passo 11, immagine 2 di 3 ASUS K751MA- DS21TQ  Screen Replacement: passo 11, immagine 3 di 3
    • Separate bezel the bezel across the bottom to the hinge.

    • Separate the other hinge cover.

    • Work from bottom to top to separate the bezel sides.

    • Spudge along the top of the bezel to finish separating the bezel.

    • De-route cables from around left of the screen, noting the routing.

  12. ASUS K751MA- DS21TQ  Screen Replacement: passo 12, immagine 1 di 3 ASUS K751MA- DS21TQ  Screen Replacement: passo 12, immagine 2 di 3 ASUS K751MA- DS21TQ  Screen Replacement: passo 12, immagine 3 di 3
    • De-route cables from around right side of the screen, noting the routing.

  13. ASUS K751MA- DS21TQ  Screen Replacement: passo 13, immagine 1 di 2 ASUS K751MA- DS21TQ  Screen Replacement: passo 13, immagine 2 di 2
    • Lift the edge of the tape on the camera enough to expose the screw on the digitizer circuit board.

    • Remove two ~3mm screws from the digitizer board.

    • Remove one ~4mm screw from the top of the right screen frame.

    • Remove one ~4mm screw from the top of the left screen frame.

  14. ASUS K751MA- DS21TQ  Screen Replacement, Disconnect the LCD assembly: passo 14, immagine 1 di 1
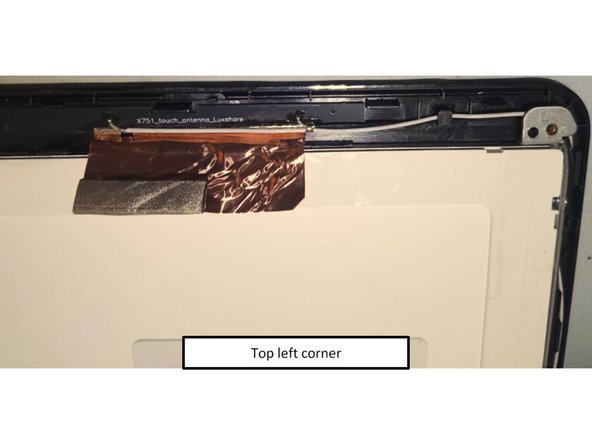
    • Lift the copper tape from the screen.

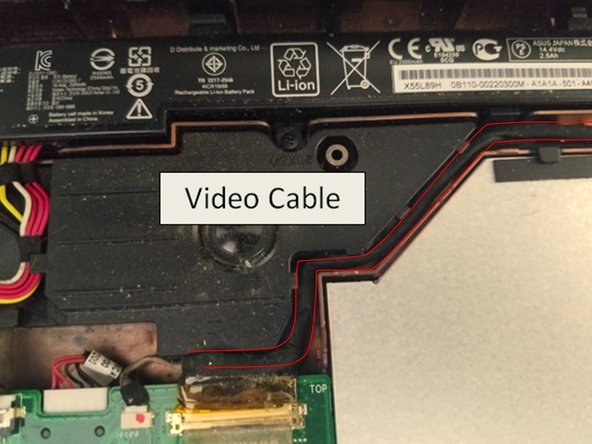
    • Untape and slide out the video cable connector from the back of the screen.

  15. ASUS K751MA- DS21TQ  Screen Replacement: passo 15, immagine 1 di 1
    • Remove 4 ~3mm screws from the left screen frame.

    • Remove 4 ~3mm screws from the left screen frame.

  16. ASUS K751MA- DS21TQ  Screen Replacement: passo 16, immagine 1 di 1
    • The screen is taped down all the way around with a very strong bond double-faced foam tape. Use a heat gun or hair dryer to soften the bond.

    • To separate the screen from the bezel, start spudging on the left side (when facing the front of the display).

    • Avoid the circuit boards at the top.

    • Work across the top and bottom while gently lifting the free side.

    • After removing the screen remove the remnants of the tape from the bezel in preparation for reassembly.

    • Take great care to not touch the clear digitizer glass with hands or tape adhesive.

    • Using nitrile, latex, or vinyl gloves will keep fingerprints from the display.

    • Apply hot air to loosen the bond. Too much heat will allow spots of adhesive to stick to the bezel.

    • Use a spudge to start lifting the tape, then grip with your fingers to pull the tape up.

    • Use a tacky portion of the old tape to lift off adhesive remaining in the tape channel.

    • Use a cotton swab moistened with isopropyl alcohol to thoroughly clean any remaining tape from the tape channel.

    • If the inside if the glass digitizer panel gets smudged:

    • Lightly dampen a clean microfiber cloth with a mixture of 60% isopropyl alcohol and 40% distilled water.

    • Wipe the smudges clean, then dry with a dry area of the microfiber cloth.

    • Prepare the VHB Double Sided Heavy Duty Mounting tape for reassembly.

    • Using a perfectly cleaned nylon cutting board, place a 12" strip of tape on the board.

    • Using a sharp razor knife and a straight edge guide, cut a 6mm strip off each side.

    • Place a 17" piece of tape on the cutting board and cut it lengthwise down the center.

  17. ASUS K751MA- DS21TQ  Screen Replacement, Apply the double sided tape to the LCD assembly: passo 20, immagine 1 di 2 ASUS K751MA- DS21TQ  Screen Replacement, Apply the double sided tape to the LCD assembly: passo 20, immagine 2 di 2
    • Remove the protective covering from the new screen.

    • Replace the the frame on both sides of the screen. Step 15 shows the frame attached to the screen.

    • Clean the face of the metal frame with isopropyl alcohol, taking care to avoid touching the LCD screen.

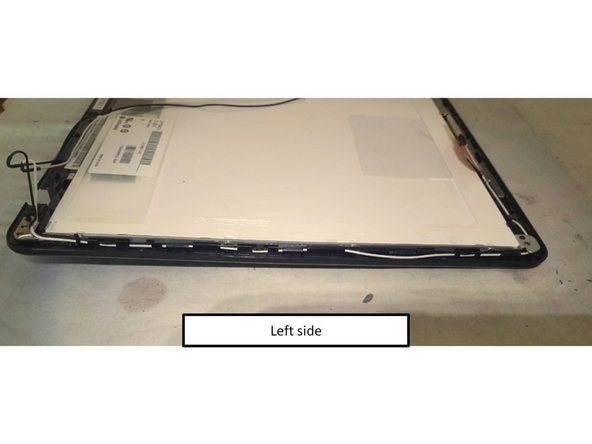
    • Apply the 12" strips to the sides with the original edge (not the side cut with the razor) to display side edge of the metal part of the frame. Do not let the tape overlap the LCD.

    • Do not let the tape overlap the LCD.

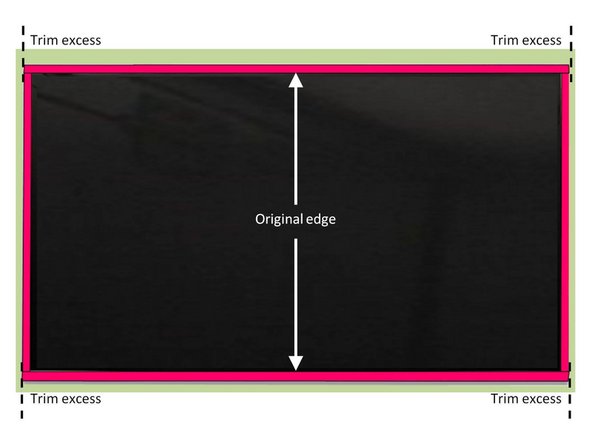
    • Trim the excess tape off the ends as shown to allow the tape at the top and bottom to cover from edge to edge.

    • Apply the 17" strips to the top and bottom of the frame with the original edge (not the side cut with the razor) to the metal part of the frame.

    • Trim the excess tape off top and bottom even with the outside edge of the tape on the sides.

  18. ASUS K751MA- DS21TQ  Screen Replacement, Attach the LCD assembly to the bezel: passo 21, immagine 1 di 1
    • Make sure the inside of the digitizer screen and LCD are completely dust and fingerprint free.

    • Place the digitizer face down with hinge covers toward you.

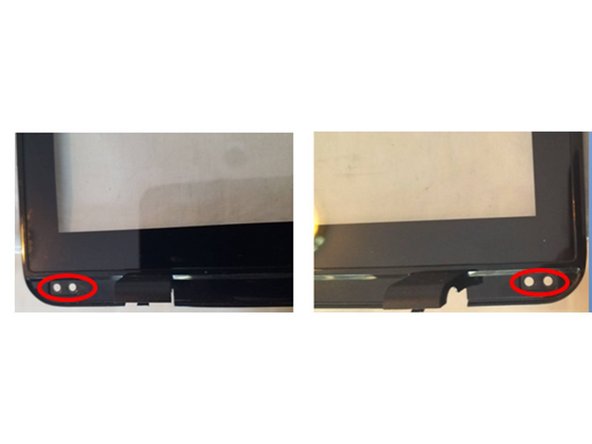
    • Align the bottom of the screen frame with the alignment pegs on the bezel.

    • Lower the screen into the digitizer / bezel and press down along the edges.

    • Return to Step 14 (Disconnect the LCD assembly), and reassemble by completing the steps in reverse order.

Conclusione

To reassemble your device, return to Step 14 (Disconnect the LCD assembly), and reassemble by completing the steps in reverse order.

fba

Membro da: 07/04/18

289 Reputazione

1 Guida realizzata

0 Commenti

Aggiungi Commento

Visualizza Statistiche:

Ultime 24 Ore: 0

Ultimi 7 Giorni: 0

Ultimi 30 Giorni: 4

Tutti i Tempi: 76