Salta al contenuto principale

ASUS E210MA-TB.CL464BK Touchpad Replacement

Cosa ti serve

  1. ASUS E210MA-TB.CL464BK Touchpad Replacement, Touchpad: passo 1, immagine 1 di 3 ASUS E210MA-TB.CL464BK Touchpad Replacement, Touchpad: passo 1, immagine 2 di 3 ASUS E210MA-TB.CL464BK Touchpad Replacement, Touchpad: passo 1, immagine 3 di 3
    • Place the laptop with the bottom side facing up. Have the front (where the touchpad is) facing toward you.

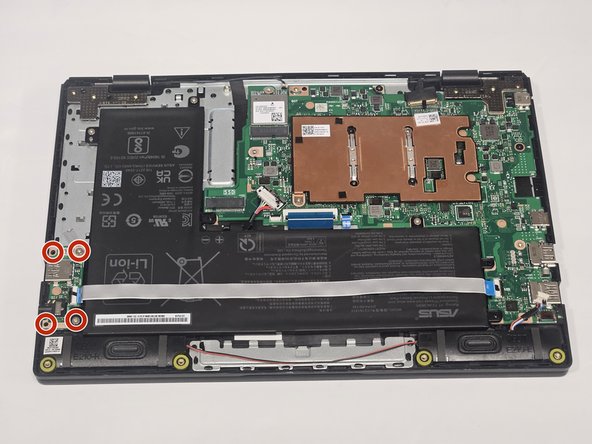
    • Start by removing the ten 7mm screws on the bottom of the laptop using a JIS #00 screwdriver.

  2. ASUS E210MA-TB.CL464BK Touchpad Replacement: passo 2, immagine 1 di 1
    • Double-check to make sure all of the screws are removed.

    • If you have a Jimmy or other flat, straight-edge object, slide it in the crack where the halves of the case meet.

    • When the parts are separated, pull them apart to expose the insides of the case.

  3. ASUS E210MA-TB.CL464BK Touchpad Replacement: passo 3, immagine 1 di 3 ASUS E210MA-TB.CL464BK Touchpad Replacement: passo 3, immagine 2 di 3 ASUS E210MA-TB.CL464BK Touchpad Replacement: passo 3, immagine 3 di 3
    • Remove the speakers as outlined in the speaker replacement guide, summarized below.

    • Remove the four 5mm screws, with a J00 screw driver.

    • Locate and remove the white plug by pulling it towards you.

  4. ASUS E210MA-TB.CL464BK Touchpad Replacement: passo 4, immagine 1 di 2 ASUS E210MA-TB.CL464BK Touchpad Replacement: passo 4, immagine 2 di 2
    • Remove the usb port as outlined in the usb port replacement guide, summarized below.

    • Remove the four 5mm screws with a J00 screwdriver.

    • You do not *need* to fully unplug and remove the USB port, but at least it is out of the way.

  5. ASUS E210MA-TB.CL464BK Touchpad Replacement: passo 5, immagine 1 di 3 ASUS E210MA-TB.CL464BK Touchpad Replacement: passo 5, immagine 2 di 3 ASUS E210MA-TB.CL464BK Touchpad Replacement: passo 5, immagine 3 di 3
    • Remove the battery as described in the battery replacement guide, summarized below.

    • Remove the five 5mm screws securing the battery with a J00 screwdriver.

    • Unplug and disconnect the tape.

  6. ASUS E210MA-TB.CL464BK Touchpad Replacement: passo 6, immagine 1 di 2 ASUS E210MA-TB.CL464BK Touchpad Replacement: passo 6, immagine 2 di 2
    • Identify the touchpad at the front of the case.

    • Unplug and remove the tape from the top of the touchpad.

  7. ASUS E210MA-TB.CL464BK Touchpad Replacement: passo 7, immagine 1 di 2 ASUS E210MA-TB.CL464BK Touchpad Replacement: passo 7, immagine 2 di 2
    • Remove the three 5mm screws from the top of the touchpad with a J00 screwdriver.

  8. ASUS E210MA-TB.CL464BK Touchpad Replacement: passo 8, immagine 1 di 2 ASUS E210MA-TB.CL464BK Touchpad Replacement: passo 8, immagine 2 di 2
    • Slide out the touchpad from under the metal bracket.pinching the top and sliding it forward and up.

Conclusione

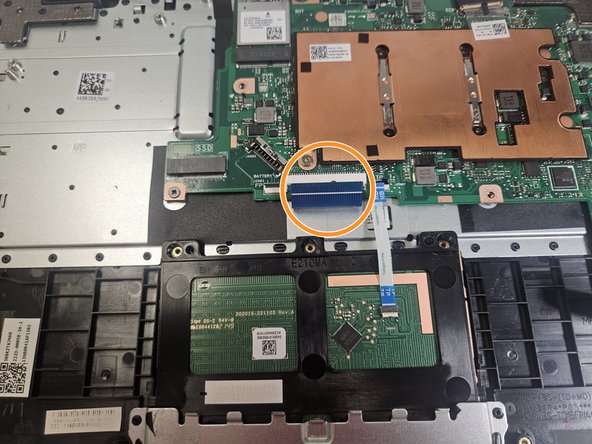
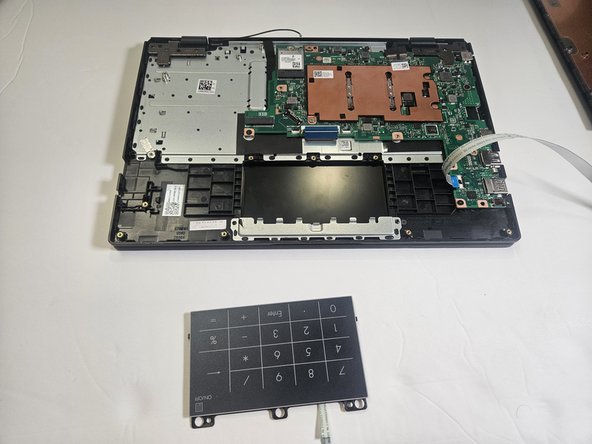
To reassemble your device, follow these instructions in reverse order.

John Hutchins

Membro da: 02/07/23

763 Reputazione

5 Guide realizzate

Team

Gateway, Team 73-6, Gonzalez Spring 2023 Membro di Gateway, Team 73-6, Gonzalez Spring 2023

GCC-GONZALEZ-S23S73G6

5 Membri

5 Guide realizzate

0 Commenti

Aggiungi Commento

Visualizza Statistiche:

Ultime 24 Ore: 1

Ultimi 7 Giorni: 3

Ultimi 30 Giorni: 6

Tutti i Tempi: 86