Salta al contenuto principale

2011 Mazda 3 Car Speaker Replacement

Cosa ti serve

  1. 2011 Mazda 3 Car Speaker Replacement, 2011 Mazda 3 Car Speaker: passo 1, immagine 1 di 3 2011 Mazda 3 Car Speaker Replacement, 2011 Mazda 3 Car Speaker: passo 1, immagine 2 di 3 2011 Mazda 3 Car Speaker Replacement, 2011 Mazda 3 Car Speaker: passo 1, immagine 3 di 3
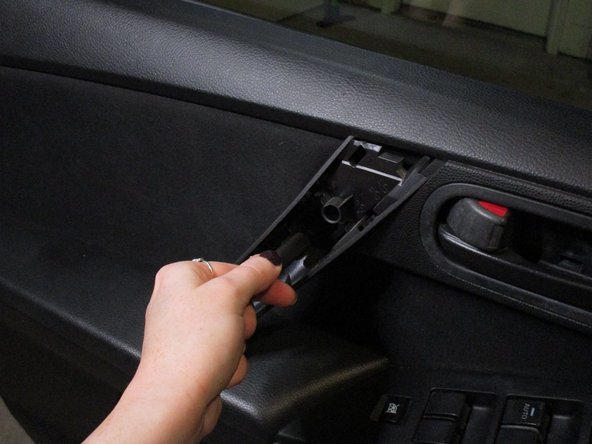
    • Pry the door handle cover upwards using a flathead screwdriver.

    • Remove the cover to expose the screw.

  2. 2011 Mazda 3 Car Speaker Replacement: passo 2, immagine 1 di 2 2011 Mazda 3 Car Speaker Replacement: passo 2, immagine 2 di 2
    • Pull the door handle towards you.

    • Insert a small flathead screwdriver between the lock and the plate.

    • Pry the plate off by applying leverage away from the lock, exposing the second screw.

  3. 2011 Mazda 3 Car Speaker Replacement: passo 3, immagine 1 di 2 2011 Mazda 3 Car Speaker Replacement: passo 3, immagine 2 di 2
    • Remove both screws with a Phillips #1 screwdriver.

    • The screws are 12mm Phillip's head. Part number (9986-50-516S).

  4. 2011 Mazda 3 Car Speaker Replacement: passo 4, immagine 1 di 1
    • Pry the door cover away from the frame using a heavy-duty spudger.

    • The door cover will not be removed entirely in this step.

    • Prying the door off takes substantial force; moving around the door's perimeter will help unhook the clips that line the panel.

  5. 2011 Mazda 3 Car Speaker Replacement: passo 5, immagine 1 di 2 2011 Mazda 3 Car Speaker Replacement: passo 5, immagine 2 di 2
    • Push the switch panel out from the inside of the door cover.

    • Ensure the car is off before proceeding.

    • Remove the wires connected to the panel by pressing the clips and pulling them outward.

    • Remove the door cover.

  6. 2011 Mazda 3 Car Speaker Replacement: passo 6, immagine 1 di 1
    • Use a Phillips #1 screwdriver to remove the four screws that secure the door speaker.

    • The screws are 10mm Phillip's head. Part number (9984-50-616).

  7. 2011 Mazda 3 Car Speaker Replacement: passo 7, immagine 1 di 1
    • Remove the wires connecting the speaker by pressing the clip and pulling it outward.

Conclusione

To reassemble your device, follow these instructions in reverse order.

Altre 2 persone hanno completato questa guida.

0 Commenti

Aggiungi Commento

Visualizza Statistiche:

Ultime 24 Ore: 3

Ultimi 7 Giorni: 23

Ultimi 30 Giorni: 95

Tutti i Tempi: 2,414