Questa versione può contenere modifiche errate. Passa all'ultima istantanea verificata.
Cosa ti serve
-
Questo passaggio è privo di traduzione. Aiuta a tradurlo
-
Open the hood by pulling the hood lever in the driver-side footwell.
-
Reach under the center of the grille and press the hood latch.
-
-
Questo passaggio è privo di traduzione. Aiuta a tradurlo
-
In this guide we will be removing the left headlight. The steps are mirrored for the right headlight.
-
-
-
Questo passaggio è privo di traduzione. Aiuta a tradurlo
-
Use the 10 mm socket wrench to unscrew the first of three 12 mm long 10 mm hex-head screws holding in the headlight assembly. The screw is located just to the left of the headlight assembly.
-
Unscrew the second screw located approximately 6 inches below the first.
-
Locate the third screw at the bottom left corner of the headlight assembly just behind the bumper and remove.
-
-
Questo passaggio è privo di traduzione. Aiuta a tradurlo
-
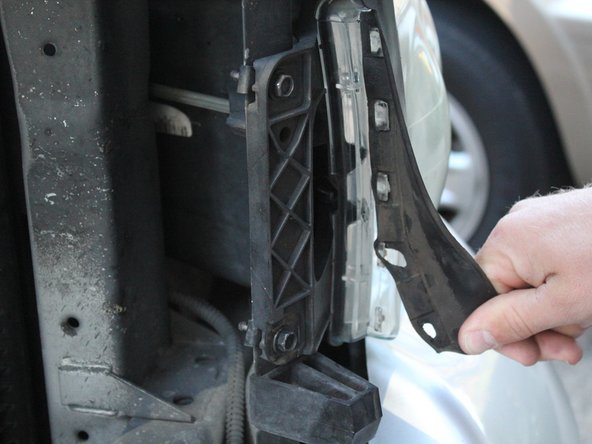
Pinch the bottom of the rubber gasket at the left side of the assembly and remove it from the plastic "buttons" on the headlight assembly.
-
-
Questo passaggio è privo di traduzione. Aiuta a tradurlo
-
Locate the blue headlight wire. Use a flathead screwdriver to pry up one side of the clamping teeth and pull the connector off.
-
Locate the green turn signal wire clamp. Use a flathead screwdriver to push in the tab on the side and pull off the connector.
-
Now that all connections between the car and the headlight assembly are disconnected, it is safe to remove the headlight assembly from the truck.
-


Annulla: non ho completato questa guida.
Altre 4 persone hanno completato questa guida.

Team

Cal Poly, Team 3-24, Amido Fall 2012 Membro di Cal Poly, Team 3-24, Amido Fall 2012
CPSU-AMIDO-F12S3G24
4 Membri
11 Guide realizzate
9 Commenti
Don't forget to explain that there is a third bolt hidden behind the wheel frame under a rubber grommet Other than that hidden bolt. I had both headlights out and replaced in 30 mins.
yep. found it. with all humbleness i ask, how do i get it? i am not a car guy. sorry. dont revoke man card.
What wrench size for the bolt in the fender?
10mm for all three of them
I have a question are all 3 bolts the same I lost the one that goes underneath the headlight between the bumper will the other two one or the other still work until I can get replacement