Salta al contenuto principale

2001-2006 Mini Cooper Radio Replacement

Cosa ti serve

  1. 2001-2006 Mini Cooper Radio Replacement, Radio / Head Unit: passo 1, immagine 1 di 3 2001-2006 Mini Cooper Radio Replacement, Radio / Head Unit: passo 1, immagine 2 di 3 2001-2006 Mini Cooper Radio Replacement, Radio / Head Unit: passo 1, immagine 3 di 3
    • Grab the knee bolster panel under the steering column with both hands.

    • Pull it down and out.

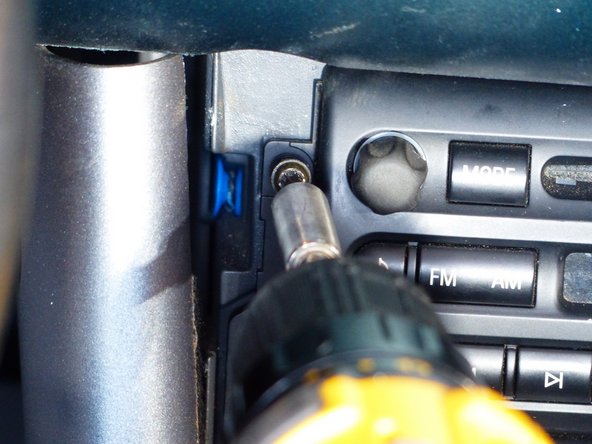
    • Using a Torx screwdriver with T30 tip, remove the two M5 x 2.5 x 25 screws in the left pillar.

  2. 2001-2006 Mini Cooper Radio Replacement: passo 2, immagine 1 di 3 2001-2006 Mini Cooper Radio Replacement: passo 2, immagine 2 di 3 2001-2006 Mini Cooper Radio Replacement: passo 2, immagine 3 di 3
    • Open the glovebox.

    • Using a Torx screwdriver with a T20 tip, remove the two M5 x 2.5 x 30 screws in the right hand side pillar.

    • Minis in America will usually have a cup holder attached with these 2 screws on the right. It will come off when the 2 screws are removed and can be set to the side.

  3. 2001-2006 Mini Cooper Radio Replacement: passo 3, immagine 1 di 3 2001-2006 Mini Cooper Radio Replacement: passo 3, immagine 2 di 3 2001-2006 Mini Cooper Radio Replacement: passo 3, immagine 3 di 3
    • With the glovebox still open, grab the bottom of the passenger dash panel and pull it forward. The panel does not need to be removed, just popped out.

    • Grab under the driver side dash panel near the radio and pull it forward. Again, the panel does not need to be removed, just popped out.

    • Pull each side of the middle dash panel until it pops out, like the previous ones.

  4. 2001-2006 Mini Cooper Radio Replacement: passo 4, immagine 1 di 3 2001-2006 Mini Cooper Radio Replacement: passo 4, immagine 2 di 3 2001-2006 Mini Cooper Radio Replacement: passo 4, immagine 3 di 3
    • Grab the left hand side pillar, then pull it out and to the left.

    • Grab the right hand side pillar, then pull it out and to the right.

    • The four screws holding the radio in should now be exposed.

  5. 2001-2006 Mini Cooper Radio Replacement: passo 5, immagine 1 di 3 2001-2006 Mini Cooper Radio Replacement: passo 5, immagine 2 di 3 2001-2006 Mini Cooper Radio Replacement: passo 5, immagine 3 di 3
    • Using a screwdriver with a T20 bit, take out the four M3 x 2 x 20 screws holding the radio in place.

  6. 2001-2006 Mini Cooper Radio Replacement: passo 6, immagine 1 di 2 2001-2006 Mini Cooper Radio Replacement: passo 6, immagine 2 di 2
    • Grab the radio and gently pull it out of the dash.

  7. 2001-2006 Mini Cooper Radio Replacement: passo 7, immagine 1 di 3 2001-2006 Mini Cooper Radio Replacement: passo 7, immagine 2 di 3 2001-2006 Mini Cooper Radio Replacement: passo 7, immagine 3 di 3
    • Pinch the antenna connector and pull it straight out.

  8. 2001-2006 Mini Cooper Radio Replacement: passo 8, immagine 1 di 2 2001-2006 Mini Cooper Radio Replacement: passo 8, immagine 2 di 2
    • For the main connector, pinch the lever arm with the piece of plastic next to it.

    • Lift up on the arm and pull the connector out.

    • The radio can now be removed from the car.

Conclusione

To reassemble your device, follow these instructions in reverse order.

Altre 5 persone hanno completato questa guida.

Un commento

I bought everything to install a aftermarket radio in my 2005. Mini s. Everything lights up. Stations tune in but no sound

Roy Ober - Replica

Aggiungi Commento

Visualizza Statistiche:

Ultime 24 Ore: 5

Ultimi 7 Giorni: 50

Ultimi 30 Giorni: 237

Tutti i Tempi: 11,168